

Arduino is an open-source hardware and software company. It designs single-board microcontrollers to control electronic devices. The microcontroller board itself is called Arduino and in this article, we will refer to the board itself by the term ‘Arduino’.
So what exactly the Arduino is?
In simple words, Arduino is a microcontroller that can control electronic circuits. What does it mean?
Now in an electronic circuit, there can be some inputs and outputs. The inputs can be any input collected by sensors viz motion sensor, sound sensor, etc. The outputs can be in the form of any output on the screen or the motion of mechanical motors.
In general, an Arduino is a board that can be programmed to build hardware projects. If you are familiar with C/C++ programming, you can easily get up with Arduino. Many professionals, students, and programmers use Arduino to make command-based robots and other kinds of projects.
Why should you use choose Arduino over the other microcontroller boards?
There are various microcontroller boards available, but there are many reasons why you should go with the Arduino –
- It is comparatively cheaper as compared to other microcontroller platforms.
- The Arduino IDE is cross-platform as it runs on Windows, Linux operating systems, and Mac.
- Arduino has a big community. So you can anytime ask for help in the forums. Just if you get stuck in anywhere.
- Thousands of Tutorials and video lessons are available on the internet. Moreover, you can find pre-built projects for your reference.
Arduino Architecture
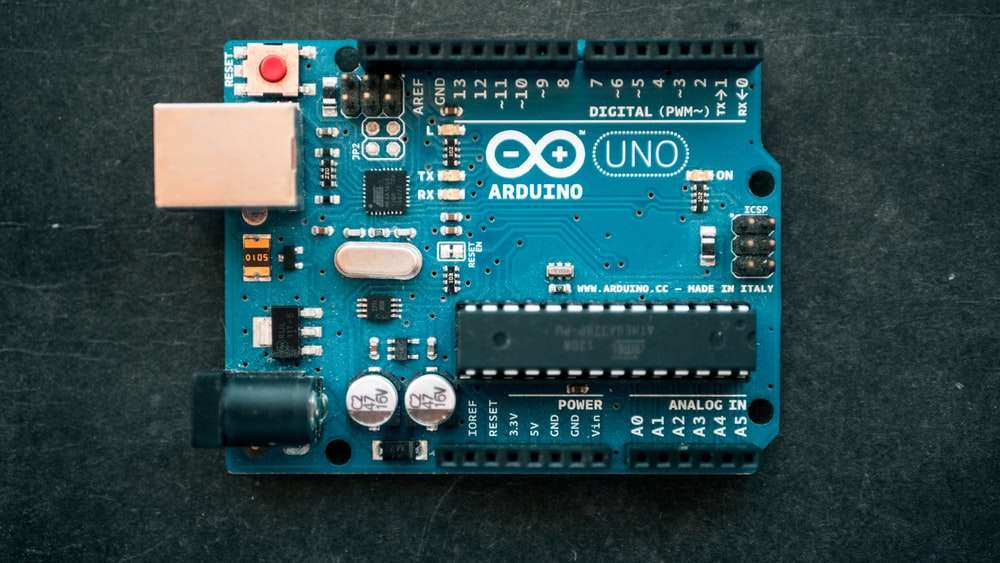
Arduino board contains a number of different parts on a single circuit board. There are many variations of the Arduino but basically, it contains the following parts.
1) I/O pins: A number of pins are used to connect various things to Arduino. For example, if you want to connect a DC or a servo motor.
These pins are of two types –
a) Digital pins: They can read and write only a single state out of ON and OFF. Most of the Arduino has 14 digital pins.
b) Analog Pins: They can read a range of different types of values and are mostly six in number in most of the Arduinos.
These pins can be further interfaced to various expansion boards (commonly called ‘shields’) or breadboards.
2) Power Connector: It provides the necessary power to the Arduino and a low voltage to the devices connected to it. It can be connected to a low voltage AC adapter or a battery.
3) Microcontroller: This is the main chip on the board which is the microcontroller itself. When you program an Arduino for a specific task, this microcontroller executes your commands to generate the desired output.
4) A USB connector: It can be used for various purposes. You can connect your board with your computer through this port. You can also supply the power to the board.
5) Power LED indicator: This LED would light up whenever you plug in your Arduino to a power source to indicate that the board has been connected correctly. If this light doesn’t turn then the connection would be incorrect.
6) Voltage Regulator: Its function is to control the voltage supplied to the Arduino and stabilize the DC voltage used by the processor and the other parts.
How to program an Arduino?
There is an IDE (Integrated Development Environment) known as Arduino IDE which you can install on your computer and start programming your Arduino. The code that you write gets loaded into the microcontroller. The Arduino code is called a sketch. The Arduino code looks like the code of C and C++. You can say it’s a derivative of the two languages with some extra Arduino-specific functions.
The Arduino IDE is open source which means you can run it on Windows, Mac OS, and Linux as well. It is open source so you can download it free of cost through the internet. The IDE is written in the Java programming language.
A sample example –
This code would light an led connected to the Arduino.
int led = 13; // This is the pin number the LED is connected to

void setup()
{
        pinMode(led, OUTPUT) // Here we are declaring the LED as an output
}
void loop()
{
        digitalWrite(led, HIGH) // Turn the LED on
}